There are many sources of where people find images of zombies. A certain source I find interesting is zombies from The Walking Dead. Here is an image of a zombie from The Walking Dead
Here is a comparison to the zombie version of the normal actor. As you can see on the left her skin is more pale and seems more dry. This creates a visual zombie aspect to what people usually see. Furthermore around the cheek bone it is enhanced to make her look more skinny and zombie like. People say that the reason why the cheek bones are so exaggerated is because the soft tissue decays away faster than your muscle as you as you rot. So this may be the reason why her cheek bones are so pointy in some people's perspective.
The eye colour also gives away whether a person is a zombie or not because most zombies in movies tend to either have yellow pupils or pale looking eyes, like grey. In this case her eyes are yellow and are blood shot around the sclera.
Some zombies tend to illustrate a story right before they died. This zombie seems to have a bite mark around her neck hence the reason why she is a zombie. The make up is enhanced to look like her throat has been ripped because parts of her skin his not there and all there is shown is muscle.However this is all make up and SFX, Let's look at real life decayed bodies.
Here is a mummy. Because mummies are so well preserved we can inspect what parts of the body decay first and also gives us a realistic insight what happens after we die. So here, you can see that the because the front of the nose is a cartilage and not a bone, this has decayed the fastest. In addition the eye socket and cheek bones are shown quite significantly because as the muscles shrink the bone doesn't, so the bone stays in position whilst the skin rots making the cheek bones look exaggereted in most zombie movies.
Here is more refence of zombies

This zombie is from the movie Dead Snow. As you can see like most zombies, its skin is pale and wrinkly, the eye socket tends to be dark to highlight that the skin has sunk in.
I'll attempt to draw myself as a zombie now.
As you can see the dark areas are the represent that after death your muscle from your face and body deteriorates therefore making you look skinny because the skin sinks into the skull. Furthermore here I put a bullet wound in his head to illustrate how he died. And the reason why he has no nose is because when he died his nose deteriorated first.I decided to keep my hair preserved like the mummy in the picture above. The reasoning behind is is because I want to show the my zombie self is still young and not old.
Here is the original orthographic photos that had been taken of me. I firstly changed the tone of the picture to make my skin look mud green to enhance the zombie look. I also used a layer mask to create a bullet hole in my head.
I recently heard of the film Evil Dead (2013) and I found that they use zombies and possessed people are the 'villains' in the movie. I discovered that the eye colour can also give you a sign whether something seems dead or evil. Here is a scene from the film.
I feel that the eyes of this girl makes her seem more horrifying. As a result I changed me eye colour to a red and white shade to make it seem that I am evil.
So as I've finished my Photoshop version of myself, I had to create a sculpted version of myself. The picture above was for reference so we can sculpt every angle of our face. Here is the "skull" to construct my face on.
My fingers weren't able to push the tin foil too deep for it to look like eye sockets or a nose. As a result I used this tool to push the tin foil in and it did the job perfectly.
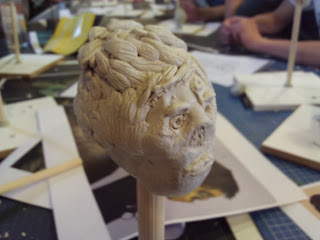
I made my skull by scrunching a long strip of foil and scrunched it into a ball and melded it into a skull. Here is the clay that I layered over my skull. The clay used isn't actually clay but epoxy between 2 materials which then made it able for me to work around my skull and sculpt.
I tried my best to include every feature that was on my Photoshop interpretation of myself onto the clay model.
Where there are incisions like the markings on the nose and the hair was by using this tool circled in red.
This tool made it applicable for me to carve into the hard clay and I was able to make marking onto me sculpture.
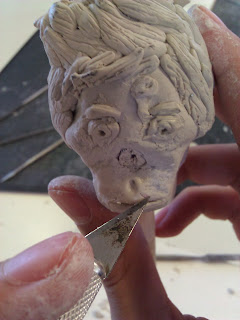
After inspecting my sculpture I saw that the chin of my zombie was exaggerated and it didn't look right. Therefore I used a metal file from one of the sculpting tools to smooth down and reduce the size of the chin.
I looked through many references and saw how the mouth was shaped when you look at the face. So I started to trial and error by adding and subtracting more clay onto my sculpture until I seen what fit best.
After creating the right size of mouth I used a tool which resembled a small spatula to smooth out the clay so that it'd look like lips. After trial and error I got the right size and then used a scalpel to create an incision between the 2 lips.
After making my mouth, I started to work on the eyes. The problem with the eyes that I previously made were that they were too oval and looked unrealistic; they looked like carton eyeballs so therefore I used a scalpel to create incisions in the clay to make an eye shape.
The incision between my lips and nose was made with this tool.
I used the smaller end and slightly put weight on the tool to create the incision. Here is a close up
So my first encounter with sculpting wasn't clay, but it was Kneadtatite (epoxy putty).
 Here you can see that the yellow and blue stripe is the material which transform into this green material. This is also a form of epoxy if you combine both yellow and blue materials together. This material was a lot harder to deal with than the clay because it can get very sticky in your hands, therefore making it harder to work with. However the clay is a lot more solid than this Kneadtatite when it drys.
Now that I've finished my sculpture I have to use the Z Brush programme to create my zombie self on that programme. Here's what I've done so far as practice.
as progress went on I started to define the neck and chest features. 
Here you can see that I've added eyeballs and eyelids to my model. The chest and neck are defined to portray how skinny and zombie like the model is. Furthermore i'll capture a side view of my model for you to see the other features I've added.
As you can see here I've protruded the model's spine to show that he's rotted as he died and got discarded. Here is the back view of my model
After trial and error of my zombie, I started to create the lips. Now the lips were quite hard but then I searched though the brush tool and found several brushes that helped make the lips like the inflat brush to create the incision between the lips. This took quite a long time to finish but I manged to do so in the end.
I found here that the eyes are way too big and the position of the nose and eyes were too high. Therefore I used the "move typological" tool to re-position them and I also used this tool to make the eyes smaller.
After having finished these features of the face It was now time to make the ear. I noticed that by looking at my reference image, I had fairly large circular ears. Therefore I used the add and move typological tool to shape the ear.
I made the shape of my ear and then started to work on defining the details of my ear. I started the ear cavity first by turning the intensity of the sub tool to create a hole. I then started to outline the edge of the ear and worked on extra detail of the ear.
Here is the final product.
I noticed that in my reference picture my ear was cut. Therefore I used the move tyopological tool to re shape the ear.
After finishing the ear I started to now work on hair. I thought that eyebrows were my first priority so I used the clay build tool to give volume to my eyebrow.
I'd like to add that I also enhanced the size of the bullet hole in my head by intensifying and re sizing the brush to give the hole a more defined look.
To make the eyebrows I gently added clay to my model until i got the shape of my eyebrow. Then I started to use the sub tool on a low size scale to make the eyebrow look like there's hair.
Here is the finished eyebrows that I done. As you can see they're a lot thicker but not as dark as the other image above.
As I finished my eyebrows I started to make my hair. For my hair I used the same technique as my eyebrows; I used the clay tool and gently added layer by layer with each stroke until I got the shape of my hair.
I this picture I have the base shape of my hair. I just need to define the hair strands and make my hair thicker and fluffy like it is in the reference picture.


